.png)
Grabar historias orales es una forma significativa de preservar relatos y recuerdos personales. Esta guía explica cómo planificar, grabar y archivar historias orales de manera efectiva. Aquí tienes un resumen rápido:
- Propósito: Define tus objetivos, como crear un archivo familiar o documentar un evento.
- Participantes: Elige narradores con experiencias de primera mano y prepara a un entrevistador empático.
- Preguntas: Utiliza preguntas abiertas, comenzando con detalles biográficos y pasando a temas más profundos.
- Equipo: Utiliza grabadoras de audio fiables o plataformas como Storii para grabaciones y transcripciones sencillas.
- Entorno: Minimiza el ruido de fondo y prueba el equipo antes de empezar.
- Realización de entrevistas: Genere confianza, escuche activamente y gestione el tiempo con cuidado.
- Preservación: Haga copias de seguridad de las grabaciones siguiendo la regla 3-2-1 y transcriba para garantizar la accesibilidad.
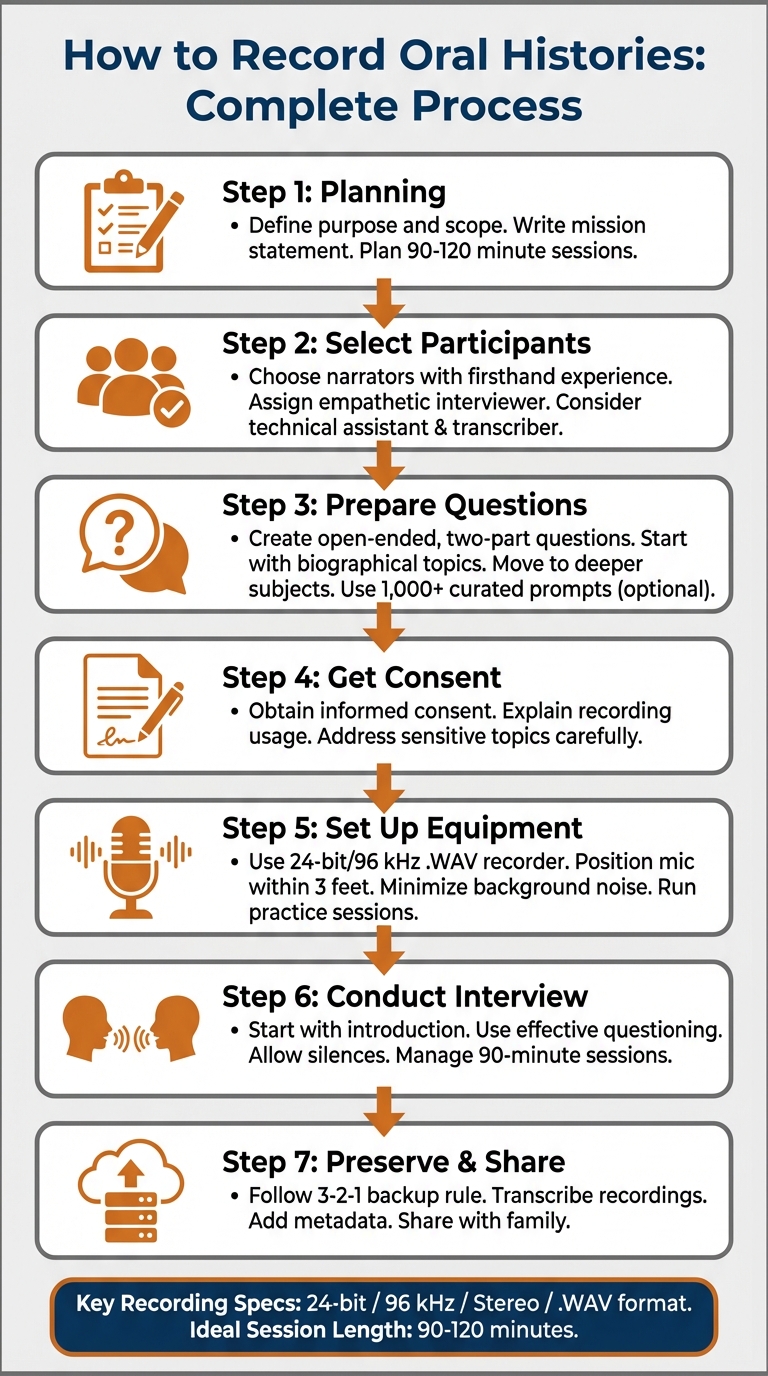
Proceso de grabación de historia oral en 7 pasos: de la planificación a la preservación
Mejores prácticas y herramientas para la grabación de historia oral - Tutorial
Planificación de su proyecto de historia oral
Una buena planificación es la base fundamental de cualquier proyecto de historia oral exitoso. Le ayuda a mantenerse enfocado, a hacer preguntas significativas y a recopilar historias que realmente capturen la esencia de su tema.
Defina su propósito y alcance
Comience por determinar qué quiere lograr. ¿Está creando un archivo familiar, escribiendo un trabajo de investigación o documentando una experiencia específica, como el servicio militar? Como señala el Sistema de Bibliotecas de la Universidad de Pittsburgh , "tener un objetivo claro ayudará a impulsar a los participantes en el proyecto y a dirigir la línea de preguntas".
Escriba una breve declaración de misión que describa el propósito de su proyecto, las personas que planea entrevistar y cómo utilizará el material. Mantenga las sesiones de entrevista manejables: de 90 a 120 minutos es ideal para evitar cansarlos a usted y a su narrador.
Una vez que sus objetivos estén claros, piense en quién puede dar vida a estas historias de la mejor manera.
Seleccionar al narrador y asignar roles
Elija narradores que tengan experiencia de primera mano con los eventos o temas que esté explorando. La Asociación de Historia Oral sugiere priorizar a personas cuyas voces estén directamente ligadas a la historia que está documentando, al tiempo que garantiza una variedad de perspectivas. Los relatos de primera mano son mucho más valiosos que las narraciones de segunda mano.
El entrevistador desempeña un papel clave. Esta persona debe ser empática, saber escuchar bien y ser hábil para guiar las conversaciones sin acapararlas. Para proyectos más grandes, podría necesitar un equipo: un asistente técnico para manejar el equipo y un transcriptor para convertir el audio en texto. Como explica la Archivos de la Institución Smithsonian explica: "el entrevistador bien preparado sabrá qué información ya está en los documentos y utilizará la entrevista de historia oral para buscar nueva información, aclaraciones o una nueva interpretación de un evento histórico."
Crear un guion de preguntas
Elabore sus preguntas para fomentar respuestas detalladas y significativas. Las preguntas abiertas y de dos partes suelen funcionar mejor: primero prepare el escenario y luego formule la pregunta. Comience con temas biográficos sencillos (como el lugar de nacimiento o los antecedentes familiares de una persona) antes de pasar a áreas más profundas o complejas.
Por ejemplo: "Mudarse puede ser estresante para una familia. ¿Cómo se sintió cuando dejó su hogar de la infancia?"
Si no sabe por dónde empezar, recursos como Storii ofrecen más de 1.000 indicaciones seleccionadas para ayudar a las familias a crear preguntas personalizadas. Estas indicaciones incluso se pueden personalizar y organizar a través de un portal en línea.
Una vez que sus preguntas estén listas, asegúrese de abordar el consentimiento y los temas delicados con consideración.
Abordar el consentimiento y la sensibilidad
Antes de empezar a grabar, obtenga el consentimiento informado de sus narradores. Explique cómo se utilizarán las grabaciones y asegúreles que pueden omitir preguntas o pausar la entrevista cuando lo deseen. Guarde los temas delicados para más adelante en la conversación, una vez que se haya establecido la confianza. Además, tenga en cuenta cómo factores como la edad, el género, la raza o la etnia pueden influir en la dinámica de la entrevista. Aborde cada conversación con empatía y conciencia cultural.
Preparación para la sesión de grabación
Prepararse para una sesión de grabación significa asegurarse de que su equipo esté configurado correctamente y que su espacio esté optimizado para un audio claro y comodidad.
Elige tu equipo de grabación
Tu elección de equipo dependerá de tu presupuesto y de tu familiaridad con la tecnología. Para grabaciones de alta calidad, opta por una grabadora de audio digital que admita archivos .WAV sin comprimir de 24 bits/96 kHz. Una buena opción es la Tascam DR-40, que cuesta menos de 200 $ [13, 14].
Combina tu grabadora con un micrófono de condensador externo con conexiones XLR balanceadas de 3 pines para una mejor calidad de sonido. Los micrófonos de solapa con cable, como los de Audio-Technica (también por menos de 200 $), son excelentes para este propósito.
Si trabajas con participantes que no son muy diestros con la tecnología o realizas entrevistas a distancia, considera un servicio como Storii. Ofrece grabaciones telefónicas automatizadas y transcripción por 119 $ al año, permitiendo hasta tres llamadas de 10 minutos por semana. Storii tiene una calificación de usuario de 4.8 estrellas, lo que la convierte en una opción fiable.
"El equipo que elijas es tan bueno como tu habilidad para usarlo de la mejor manera. Y la mejor forma de aprender las posibilidades y los matices de una grabadora y un micrófono es practicar con ellos." – National Park Service
Configura el entorno de grabación
Elige una habitación con alfombras y mobiliario blando para absorber el sonido y reducir los ecos. Coloca el micrófono a no más de un metro del narrador, asegurándote de que esté alineado con su voz para la mejor claridad.
Para minimizar el ruido de fondo, apaga cualquier cosa que zumbé, haga tictac o genere sonido, como televisores, radios, neveras y aires acondicionados. Cierra ventanas y puertas, y pon los teléfonos móviles en silencio (no en vibración, ya que puede causar zumbidos). Usa sillas fijas en lugar de sillas con ruedas para evitar chirridos o ruidos de movimiento [14, 15]. Ten agua y pañuelos a mano para la tos o momentos emotivos, y usa un soporte de micrófono en lugar de sujetar el micrófono para eliminar el ruido de manipulación.
Una vez que tu espacio esté listo, haz una prueba rápida para asegurarte de que todo funciona según lo previsto.
Realiza sesiones de práctica
Probar tu configuración es imprescindible antes de la entrevista real. Como lo expresa el Archivo de la Institución Smithsonian:
"Practica hasta que domines sus matices." – Smithsonian Institution Archives
Comience con una grabación de prueba sobre un tema informal para guardar las mejores historias de su narrador para la sesión real. Durante la prueba, ajuste los niveles de grabación entre -6 dB y 0 dB para evitar distorsiones. Asegúrese de que tanto usted como su narrador hablen durante la prueba para confirmar que todas las voces se capturan con claridad. Utilice auriculares para monitorear la grabación en tiempo real, lo que le ayudará a detectar problemas como caídas de audio, sillas que chirrían o zumbidos distantes que de otro modo pasarían desapercibidos [13, 14].
Las sesiones de práctica no son solo para probar el equipo, sino que también ayudan a generar familiaridad y comodidad entre usted y el narrador. Esto puede hacer que la entrevista real se sienta más como una conversación natural que como una sesión formal de preguntas y respuestas [5, 12]. Además, estas pruebas dan un impulso de confianza a todos los involucrados antes del gran día.
sbb-itb-ce27d7a
Realización de la entrevista de historia oral
El éxito de una entrevista de historia oral a menudo depende de la creación de un ambiente cómodo y de confianza para su narrador. Una atmósfera relajada los anima a compartir historias y perspectivas significativas.
Comience con una introducción
Para preparar el terreno, llegue temprano y entable una conversación informal mientras configura su equipo. Esta interacción informal ayuda a que su narrador se sienta cómodo antes de que comience la grabación.
Una vez que esté listo, explique el propósito del proyecto, cómo se utilizará la grabación y los derechos del narrador. Deje claro que pueden omitir cualquier pregunta o solicitar pausar la grabación en cualquier momento. Esta transparencia fomenta la confianza y les da una sensación de control sobre el proceso.
Comience cada grabación con una introducción formal. Incluya su nombre, el nombre del narrador, la fecha, la ubicación (descrita de forma general, como "la casa del narrador", para proteger la privacidad) y el nombre del proyecto. Obtenga el consentimiento verbal para grabar y acuerde una duración de la sesión —normalmente de 90 minutos a 2 horas— para establecer expectativas claras.
Comience con preguntas biográficas sencillas como: "¿Cuándo y dónde nació?" Estas preguntas directas ayudan a su narrador a sentirse cómodo en la conversación.
"Una buena entrevista se trata tanto de temperamento como de técnica. Los atributos importantes de un entrevistador son la empatía, el deseo de aprender y la capacidad de escuchar con respeto. Las buenas entrevistas surgen de la confianza y el respeto." – Servicio de Parques Nacionales
A partir de ahí, guíe la conversación hacia una narración más profunda con preguntas reflexivas.
Utilice técnicas de preguntas eficaces
La clave para una entrevista enriquecedora reside en hacer preguntas abiertas que fomenten respuestas detalladas. Frases como "Hábleme de..." o "Describa..." invitan a su narrador a compartir sus experiencias en profundidad. Continúe con preguntas que exploren el "cómo" y el "por qué" para obtener más información.
La escucha activa es crucial. Evite interrumpir y permita momentos de silencio; estas pausas le dan tiempo a su narrador para reflexionar y elaborar. Utilice señales no verbales como asentir o sonreír para mostrar que está involucrado, pero evite las afirmaciones verbales que podrían interferir con la grabación.
Si el narrador utiliza términos técnicos o jerga desconocida, pida una aclaración para asegurar que la historia siga siendo accesible. Las ayudas visuales como fotografías, mapas o artefactos también pueden ayudar a refrescar su memoria y enriquecer la conversación.
Si bien un esquema de preguntas preparado es útil, no dude en seguir tangentes inesperadas. Algunas de las mejores historias surgen cuando el narrador se siente libre de explorar temas a su manera. Encuentre un equilibrio entre ceñirse a los objetivos de su proyecto y dejar que el narrador destaque lo que considera más significativo.
Gestione el tiempo y las emociones
Keep sessions to around 90 minutes, with a maximum of 2 hours, to prevent fatigue. Begin with lighter, easy questions to build trust before addressing more sensitive topics. Pay attention to the narrator’s tone, expressions, and body language to gauge their comfort level. If they seem tired or distressed, offer a break or wrap up the session.
Allow silences - they often lead to deeper, more thoughtful responses. If the conversation veers off-topic, gently guide it back without dismissing the narrator’s input. Should time run out and the narrator has more to share, consider scheduling another session rather than rushing through important details.
"The experienced interviewer maintains rapport by... challenging questionable information in a non-threatening way, and generally maintaining an atmosphere in which the interviewee feels able to respond fully and truthfully." – Martha Ross, Smithsonian Institution Archives
Conclude the Interview
Wrap up by asking reflective, summarizing questions that help the narrator process the experience. Encourage them to share any additional thoughts or address anything they feel was overlooked. These closing moments often provide unexpected insights.
End the session by expressing gratitude and outlining next steps, such as when they can expect a copy of the recording or transcript. Afterward, jot down field notes about the session’s dynamics and the narrator’s emotional state - these details will be invaluable during transcription and analysis.
Saving and Preserving Recordings
After wrapping up a successful interview, it’s crucial to secure your recordings to protect these irreplaceable memories. The Oral History Association offers a straightforward guideline: "Lots of Copies Keep Stuff Safe" (LOCKSS). In other words, make multiple identical copies and store them in separate locations.
Back Up Your Files
Stick to the 3-2-1 rule: create 3 copies of each file, store them on 2 different types of storage media (like an external hard drive and cloud storage), and keep 1 set of copies in an offsite location. As soon as possible, transfer your recordings to a secure computer or server. Use clear and consistent file names starting with the date in YYYY.MM.DD format, followed by the narrator’s name and a keyword. For instance: "2025.12.25_JohnSmith_Interview".
When saving audio, opt for 24-bit / 96 kHz / Stereo / .WAV format instead of compressed formats like MP3, which aren’t ideal for long-term preservation. To keep up with hardware wear and technological updates, copy files to new storage devices every five years. Make sure to document where your backups are stored, what they contain, and how they’re organized for easy reference later.
Once your recordings are securely backed up, focus on transcribing them to make them more accessible in the future.
Transcribe and Summarize Recordings
Transcripts give “intellectual access” to your recordings, making them searchable and practical for family members or researchers who might not have time to listen to hours of audio. Include notes about the session's tone and any technical issues to provide additional context for future use. To ensure accuracy, compile a list of all names and any specialized terms mentioned during the interview.
Storii can automatically transcribe recordings and generate downloadable memoirs in PDF format, saving you the effort of manual transcription. If you prefer to handle transcription yourself, start with a short introduction explaining why the narrator was chosen and the conditions of the interview. Add a one-paragraph summary and a list of a dozen or so keywords to help identify the recording later.
Organize and Preserve Files
Enhance your recordings with metadata (dates, names, locations, topics) so future users can easily understand the content. Include details like:
- Administrative information (acquisition date, project ID)
- Descriptive elements (narrator name, keywords)
- Technical specs (file size, format)
- Preservation notes (checksums, condition details)
- Rights information (copyright status, signed release forms)
"Every oral history project should have a plan for archiving its oral histories that aligns with the project's goals and works within the capacity of the project's partners." – Oral History Association
Store files in widely supported formats to avoid issues with outdated technology. Keep legal release forms, interview notes, project descriptions, and any photos taken during the session with the audio files. For optimal redundancy, combine cloud storage services like Google Drive or Dropbox with external hard drives - this ensures both accessibility and local control.
Once your files are well-organized, you can focus on sharing them with your intended audience.
Share and Collaborate with Family
To complete your oral history project, ensure that legal release forms are securely stored alongside your recordings. These forms should clarify copyright ownership and outline any restrictions on access or distribution. Since oral histories are co-created, copyright usually belongs to both the interviewer and the narrator unless an agreement specifies otherwise.
Storii makes sharing simple, allowing you to send stories securely via email, SMS, or private links. The platform manages access permissions, ensuring recordings remain protected while being easily shared with chosen recipients. If you’re sharing files independently, establish clear rules about who can access master files versus copies and define restrictions for any sensitive content. To add more depth, include supplementary materials like photographs, maps, or field notes along with the recordings.
Conclusion
Capturing oral histories doesn't have to be a complicated process. By planning, recording, and preserving these stories, you can create a lasting archive of family memories that will be cherished for generations.
Storii makes the process even easier by automating recording, transcription, and sharing, so you can focus on the stories themselves. With a library of over 1,000 question prompts, the platform saves you the hassle of crafting your own interview guide from scratch.
Cameron Graham, Co-founder and CEO of Storii, highlights the value of this:
"Being able to learn about specific moments in their lives in their own words will help you understand your traditions, heritage and what shapes your family".
Storii also transcribes recordings in under two minutes and allows you to schedule up to three calls per week, making it easier than ever to document your family's oral history .
FAQs
What should I consider when planning an oral history project?
When kicking off an oral history project, start by clearly defining its purpose and scope. Think about what you want to uncover, who you plan to interview, and how the recordings will be used or shared. Dive into existing materials to spot any gaps that personal stories could fill - this can help shape your interview topics. Don’t forget to factor in practical considerations like your budget, timeline, and available resources to ensure everything stays manageable.
Ethics should be front and center. Make sure to get informed consent, prepare release forms, and set clear policies for privacy and access. Identify narrators who can authentically contribute to the story you’re looking to tell. Pre-interviews are a great way to build rapport and gather essential biographical details before diving into the main conversation.
Craft an interview guide with flexible, open-ended questions, and choose reliable recording equipment that you’ve tested in advance. Once the recording is done, label files with key details like the date, time, and participant name. Back up your data in multiple locations to avoid losing valuable content, and consider transcribing the interviews to make them more accessible. Tools like Storii can make this process easier by offering high-quality audio recording via phone, automatic transcription, and secure file storage. By addressing these steps early on, you’ll set the foundation for a meaningful and well-organized oral history project.
How can I make sure my oral history recordings sound clear and professional?
To capture clear and professional audio for oral history recordings, start by selecting dependable equipment. A digital recorder or an external microphone paired with your smartphone will produce much better sound quality than the built-in microphones most devices come with. Always test your setup beforehand to confirm that the audio levels are clear and free from distortion.
Choose a quiet, non-echoing space for your recording. A small, carpeted room works well. Reduce background noise by turning off fans, silencing phones, and closing windows. Position the microphone 6–12 inches from the speaker’s mouth, slightly off to the side, to avoid harsh sounds like pops or hisses. If you have access to one, a pop filter can further improve the sound.
For recording, use an uncompressed format such as WAV at 44.1 kHz/16-bit or higher. These settings help maintain high-quality audio for editing and long-term storage. Once the session is complete, back up your files immediately - store them on a secure computer and an external drive to ensure they’re safe from data loss. For a more streamlined, phone-based option, Storii provides automated recording, transcription, and secure cloud storage, making it simple to preserve life stories with minimal effort.
What’s the best way to preserve and share oral history recordings?
To ensure oral history recordings are preserved, start by creating high-quality digital audio files. Be sure to include essential details like the date, location, the interviewee's name, and consent information as metadata. Store the recordings in at least two secure places - such as a reliable cloud service and an external hard drive. It's also a good idea to create a lossless master copy for archival purposes, along with a more practical version for everyday use.
Transcribing the recordings is another important step. Transcriptions make the content easier to access and serve as a backup in case the audio quality deteriorates over time. When you're ready to share these recordings, use a secure platform that ensures privacy and ease of access. Tools like Storii can simplify this process by enabling phone-based recordings, offering transcription services, and even allowing you to download stories as audiobooks or PDFs. This way, cherished memories can be preserved and shared safely for future generations.
Related Blog Posts
{"@context":"https://schema.org","@type":"FAQPage","mainEntity":[{"@type":"Question","name":"What should I consider when planning an oral history project?","acceptedAnswer":{"@type":"Answer","text":"<p>When kicking off an oral history project, start by clearly defining its <strong>purpose and scope</strong>. Think about what you want to uncover, who you plan to interview, and how the recordings will be used or shared. Dive into existing materials to spot any gaps that personal stories could fill - this can help shape your interview topics. Don’t forget to factor in practical considerations like your budget, timeline, and available resources to ensure everything stays manageable.</p> <p>Ethics should be front and center. Make sure to get <strong>informed consent</strong>, prepare release forms, and set clear policies for privacy and access. Identify narrators who can authentically contribute to the story you’re looking to tell. Pre-interviews are a great way to build rapport and gather essential biographical details before diving into the main conversation.</p> <p>Craft an <strong>interview guide</strong> with flexible, open-ended questions, and choose reliable recording equipment that you’ve tested in advance. Once the recording is done, label files with key details like the date, time, and participant name. Back up your data in multiple locations to avoid losing valuable content, and consider transcribing the interviews to make them more accessible. Tools like Storii can make this process easier by offering high-quality audio recording via phone, automatic transcription, and secure file storage. By addressing these steps early on, you’ll set the foundation for a meaningful and well-organized oral history project.</p>"}},{"@type":"Question","name":"How can I make sure my oral history recordings sound clear and professional?","acceptedAnswer":{"@type":"Answer","text":"<p>To capture clear and professional audio for oral history recordings, start by selecting dependable equipment. A digital recorder or an external microphone paired with your smartphone will produce much better sound quality than the built-in microphones most devices come with. Always test your setup beforehand to confirm that the audio levels are clear and free from distortion.</p> <p>Choose a quiet, non-echoing space for your recording. A small, carpeted room works well. Reduce background noise by turning off fans, silencing phones, and closing windows. Position the microphone 6–12 inches from the speaker’s mouth, slightly off to the side, to avoid harsh sounds like pops or hisses. If you have access to one, a pop filter can further improve the sound.</p> <p>For recording, use an uncompressed format such as WAV at 44.1 kHz/16-bit or higher. These settings help maintain high-quality audio for editing and long-term storage. Once the session is complete, back up your files immediately - store them on a secure computer and an external drive to ensure they’re safe from data loss. For a more streamlined, phone-based option, <strong>Storii</strong> provides automated recording, transcription, and secure cloud storage, making it simple to preserve life stories with minimal effort.</p>"}},{"@type":"Question","name":"What’s the best way to preserve and share oral history recordings?","acceptedAnswer":{"@type":"Answer","text":"<p>To ensure oral history recordings are preserved, start by creating <strong>high-quality digital audio files</strong>. Be sure to include essential details like the date, location, the interviewee's name, and consent information as metadata. Store the recordings in at least two secure places - such as a reliable cloud service and an external hard drive. It's also a good idea to create a <strong>lossless master copy</strong> for archival purposes, along with a more practical version for everyday use.</p> <p>Transcribing the recordings is another important step. Transcriptions make the content easier to access and serve as a backup in case the audio quality deteriorates over time. When you're ready to share these recordings, use a secure platform that ensures privacy and ease of access. Tools like Storii can simplify this process by enabling phone-based recordings, offering transcription services, and even allowing you to download stories as audiobooks or PDFs. This way, cherished memories can be preserved and shared safely for future generations.</p>"}}]}Caja de regalo Storii
Ideal para ocasiones especiales como el Día de la Madre, el Día del Padre, los cumpleaños y las fiestas.

